Lissa Anglin • Part of Me Blog

Art, décor, family and photography- it's all part of me!

#anglinabode

#anglinabode master bathroom reno

AnglinAbode, HOMElissa-anglin2 Comments

Goodness, it’s been a while since I’ve done a blog post, but this HAD to be documented! We’ve finally completed the master bathroom renovation for our Anglin Abode!

When we purchased this home, we knew we’d want to do a major renovation here, and so once the kitchen was done, we started saving for the master bathroom. I’d been calling it my “dorm bathroom”, because that’s what it felt like- barely functional with little to no storage.

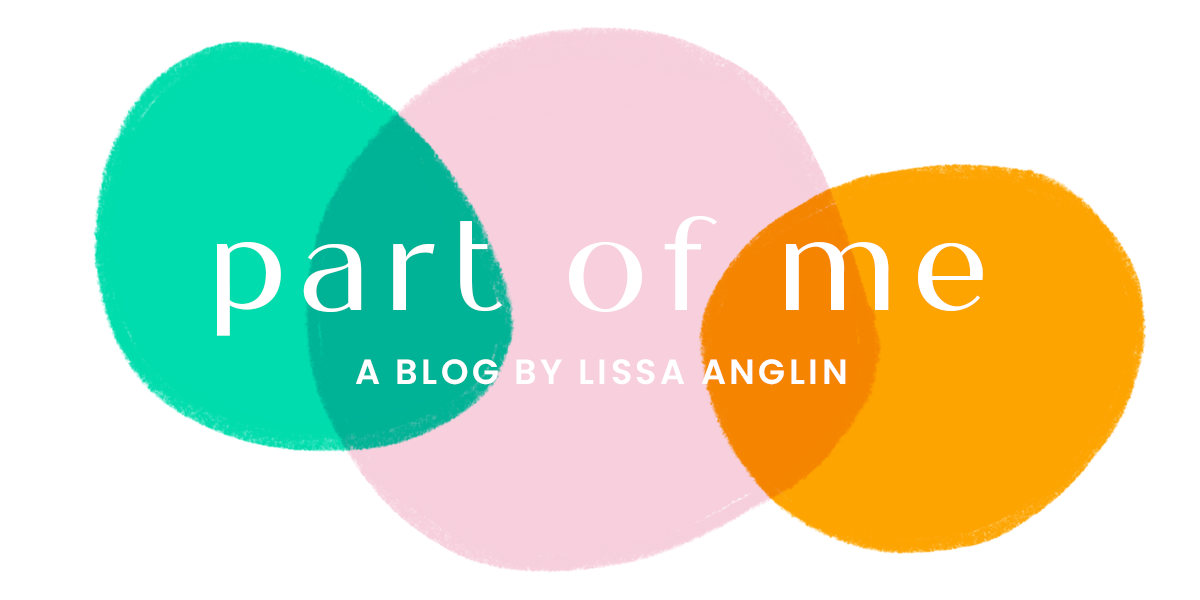
The bathroom is located at the very back of the house and was clearly a DIY add-on. It was essentially a square space that had been divided into two halves- one side being the bathroom and one being the laundry room. You can see the two doors in this old house photo below- the left is the bathroom and the right is the old laundry.

Here’s the left side- our “dorm bathroom” with basically no storage, and the toilet so close to the door I couldn’t even get it in this shot, haha!

And the other side- old laundry room. There was a door to the exterior that we ultimately decided to close in.

I COULD NOT WAIT to see what it looked like once that middle wall was removed. Here’s what it looked like! You can see the spot where the bathtub once was was in really bad shape, and we also had to contend with the water heater that was basically in the middle of the room.

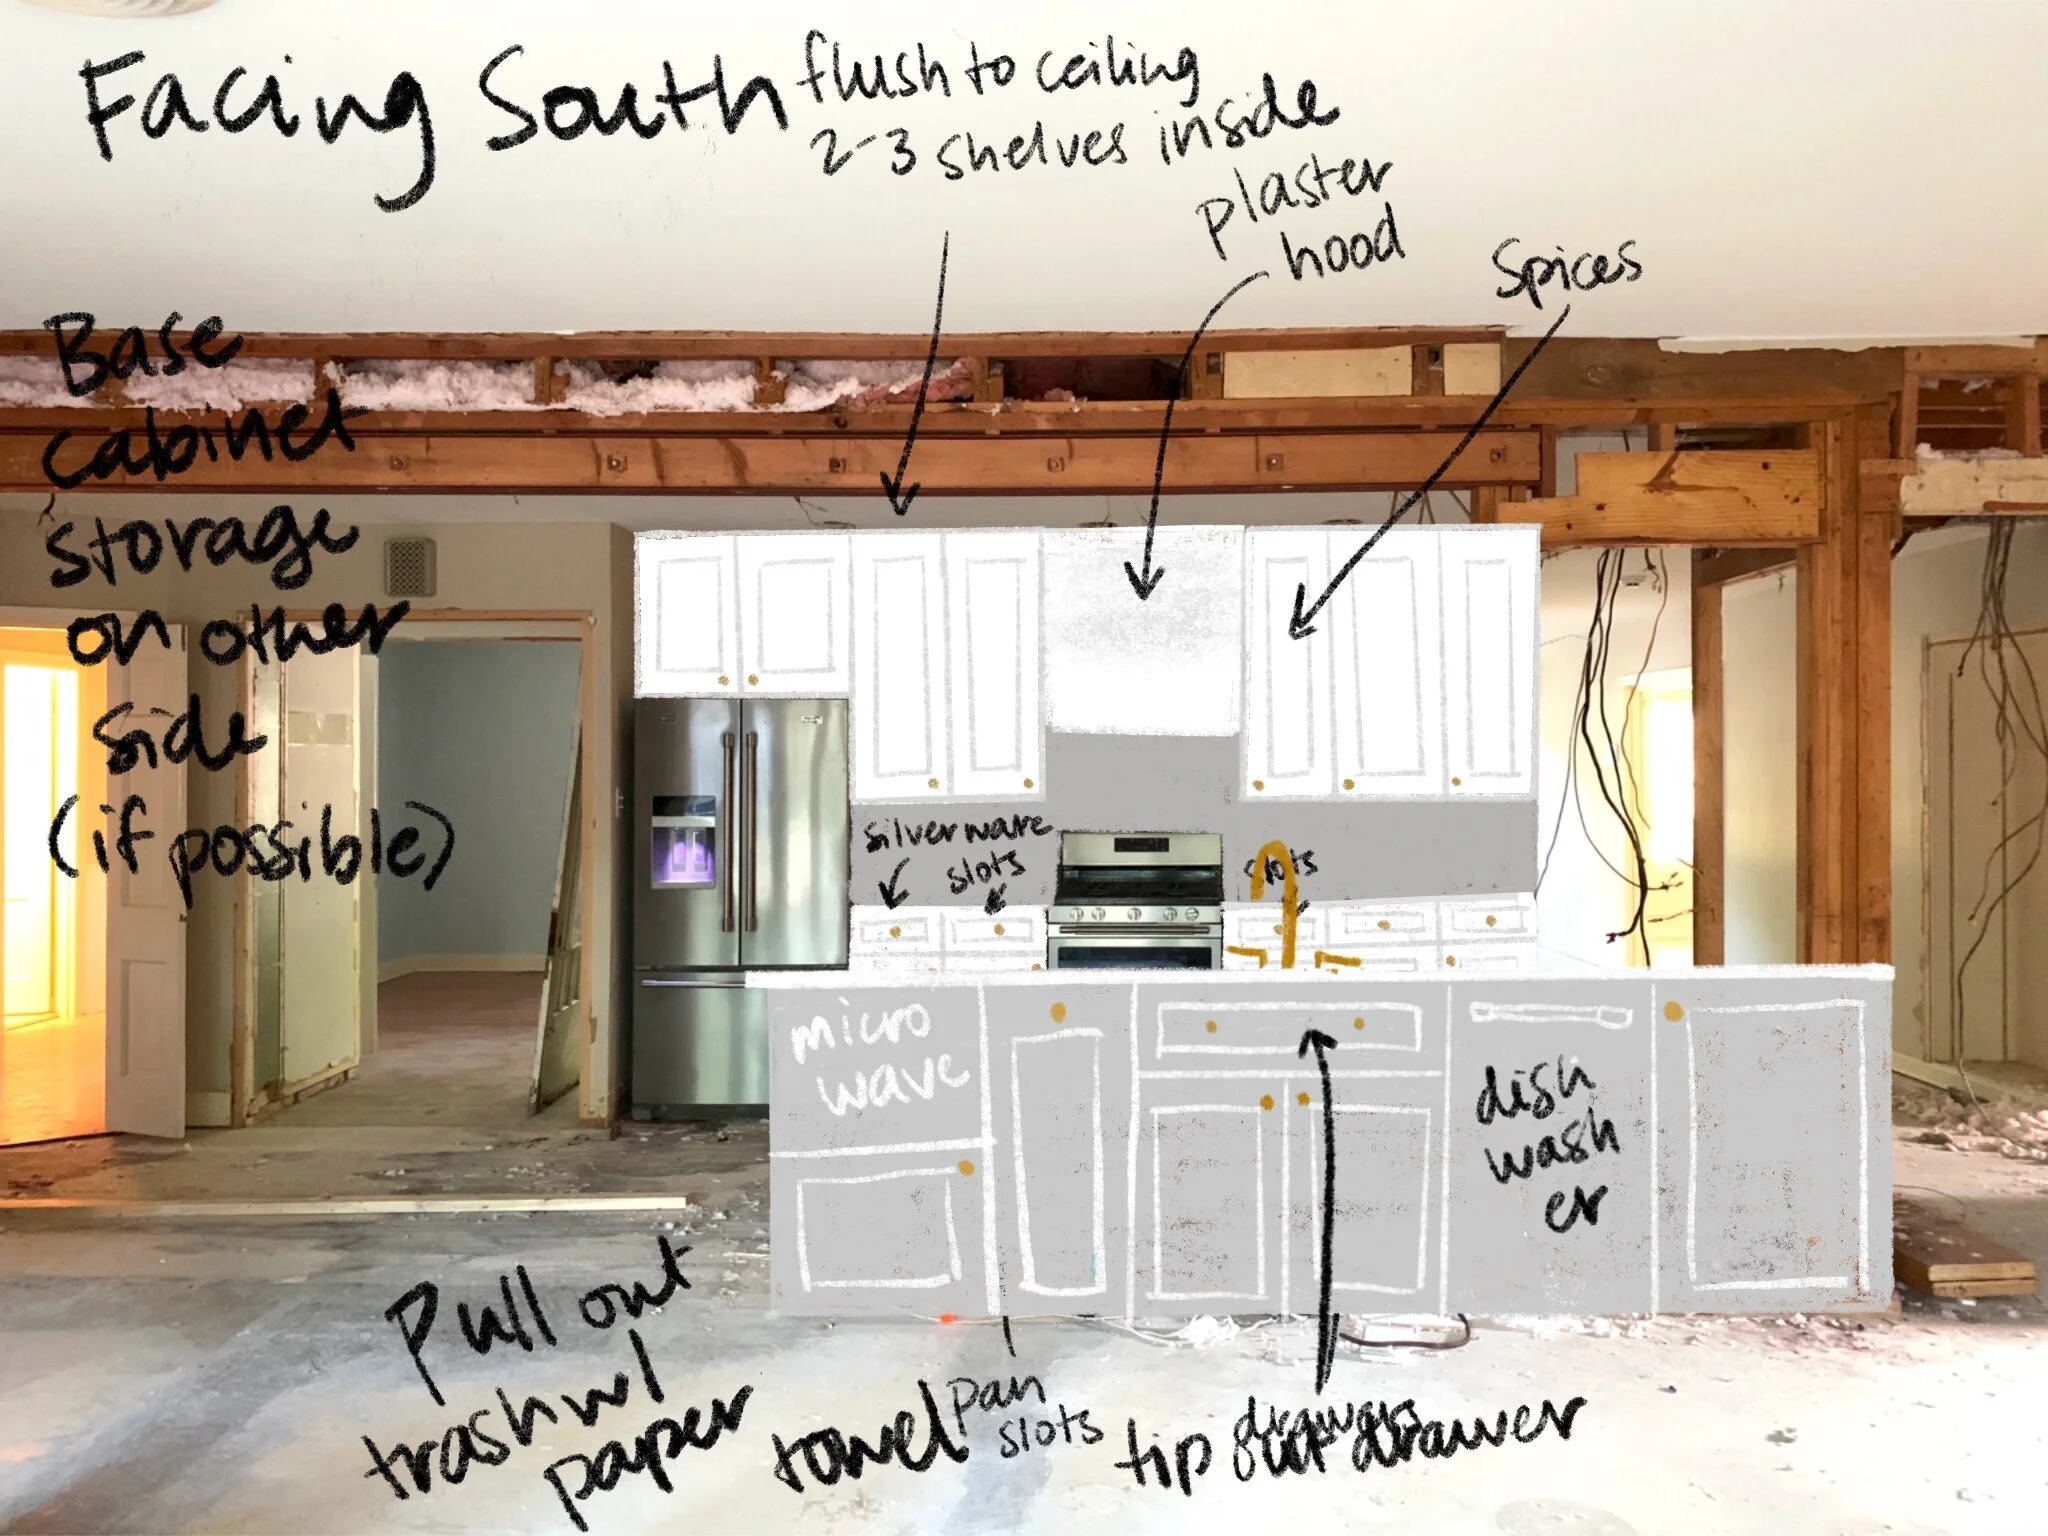
Here is my sketch of the same wall.
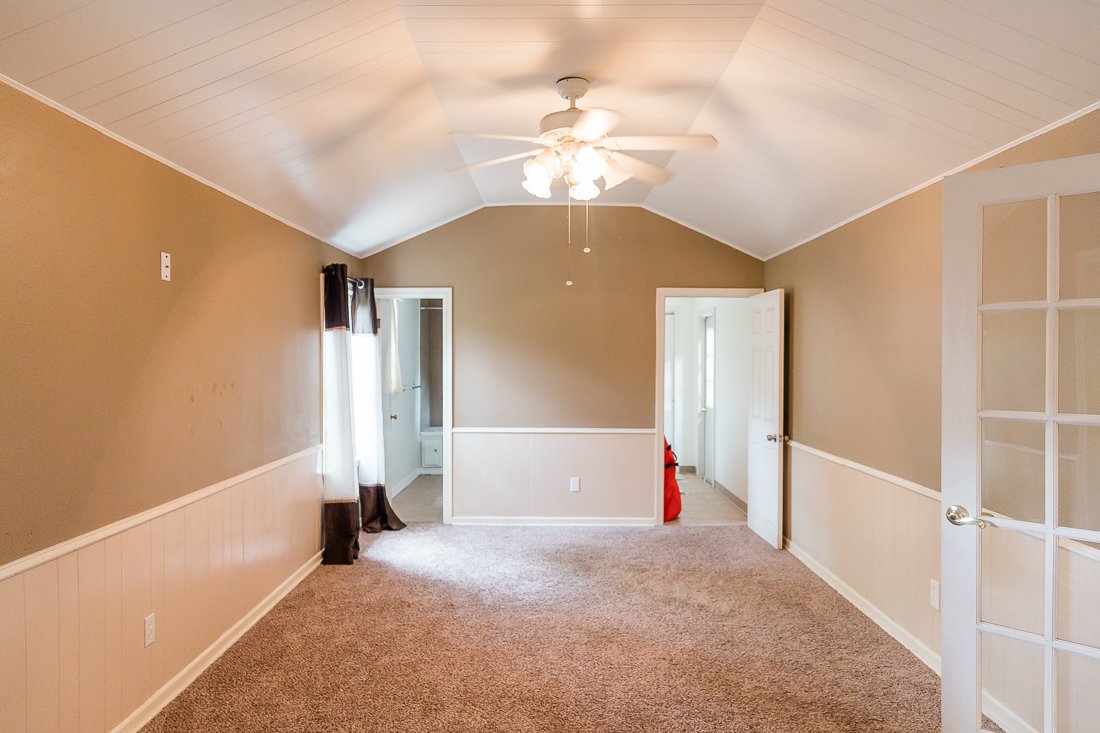
In progress:

And the final!

East wall before:

My sketch:

And after!

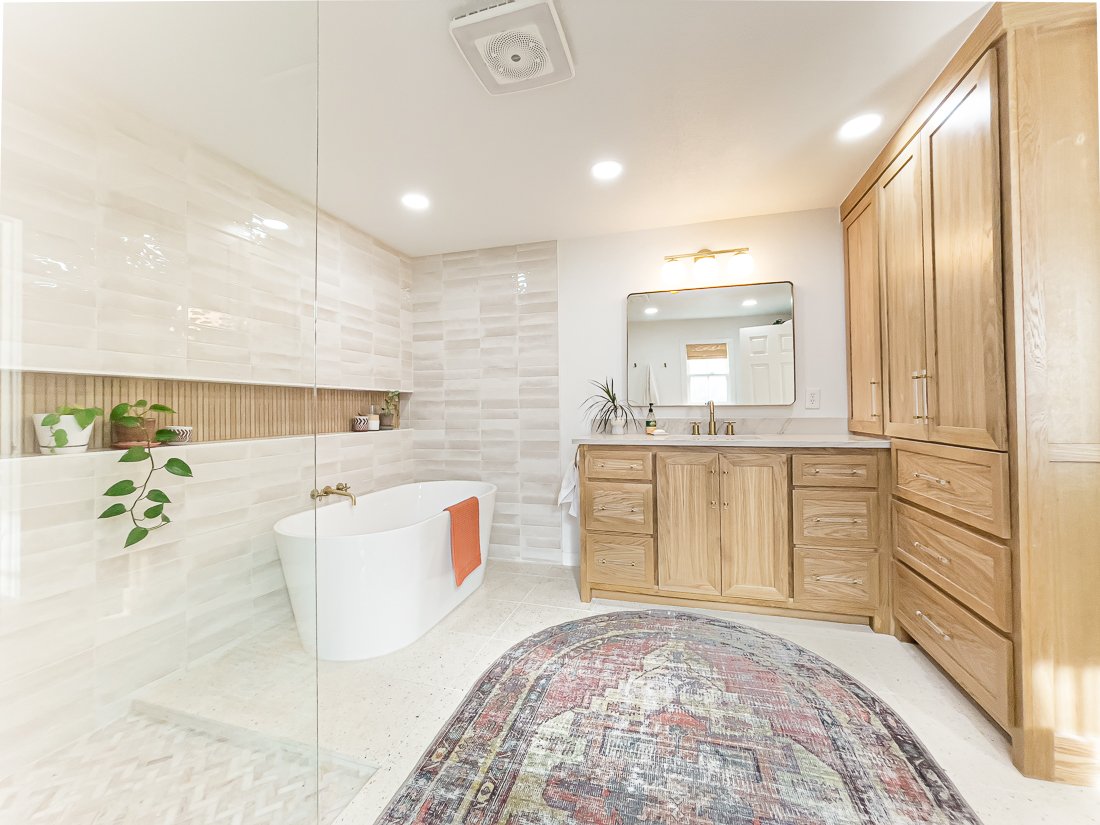
We are so in love with the way everything turned out. The square layout of the room was the biggest challenge for me, because I was set on having this semi-open shower and tub layout.

You can see below I was trying my darndest to squeeze in 2 vanities, but we eventually decided against this in order to create a more spacious feeling in the room. I also didn’t want to compromise any of that countertop (a.k.a. curling iron) space with 3 girls in the family. Thankfully, Shawn didn’t mind and so we share a sink.

I also added in a floor-to-ceiling linen closet which was much-needed. This and the vanity gives us plenty of storage and keeps the rest of the room very open feeling.

My original design also included a curbless shower and a shower niche that extended all the way across the back wall, so that it is useful for both the shower and the tub, and adds interest to the completely tiled back wall. Our contractor eventually convinced me to add a small (it is maybe 1.5”) curb to the shower just to contain the water a bit better, and I am really happy with the way it turned out. This also meant I needed to add a 4th(!) type of tile to the design.

The large shower niche was also a bit of a challenge. Remember the huge water heater that was smack dab in the middle of this back wall? We ended up swapping it out for a tankless water heater that is located in a storage closet adjacent to this room and it was one of our more costly choices, but SO worth it. I love having hot water almost immediately when we turn on the faucet- and in this 76-year-old home that is something I don’t take for granted.

Instead of creating the shower niche inside the existing wall, our contractor essentially built a faux wall on top of the structural wall, and that allowed us to run plumbing for the bathtub and create this long niche. I love the way the horizontal line creates a steady, linear design, and place for my little plants!

Let’s talk about finishes!

I wanted our bathroom to be a very peaceful, spa-like space that would feel clean and cozy. I had tons of great inspo on my Master Bath Pinterest board, but unfortunately most of the finishes there were just way out of our budget. So, my goal was to create the same look on a budget.

I was crushing over this tile from Bedrosians, but it was just too expensive for us- so I ended up with this similar tile from Home Depot, which had the same warm white and color variation.

My biggest splurge and my favorite thing in our bathroom is the terrazzo tile floor from TileBar. I’m obsessed.

The wood-look tile in the niche is also from TileBar and was backordered for a couple of months, but it was worth the wait. It matches our white oak cabinets perfectly.

I also struggled to find the right size and type of rug that would fit this space, and was so excited when I found this WASHABLE rug! It is thin but absorbent. Because of the placement of our toilet, a rectangular shaped rug was too large- so the oval was a perfect solution.

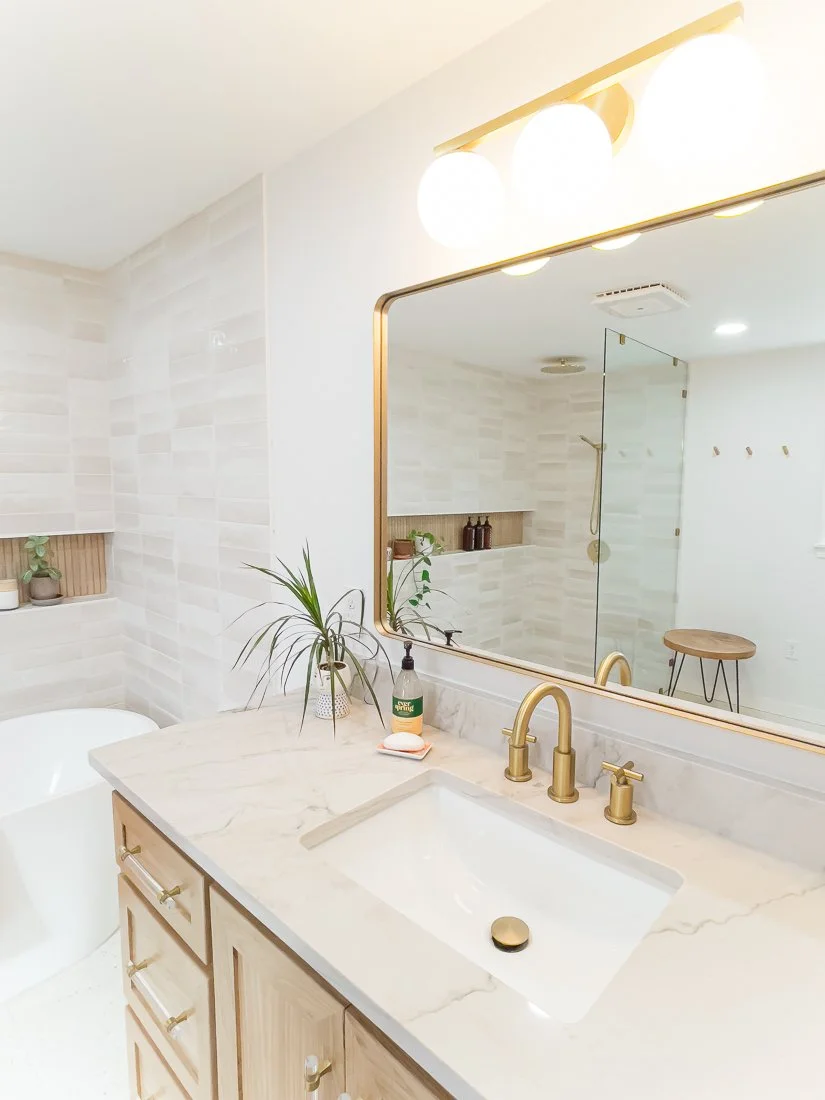
I did not initially plan on doing natural stained cabinets, but once I realized how light everything else would be in the room, I decided it would ground the space better to keep the cabinets natural. These are white oak with a clear coat finish. I loved the acrylic and gold handles I found, too- I like that they let the wood grain shine with just a touch of the gold that runs throughout our house.

The countertop is quartzite- similar to what we have in our kitchen. I love the soft grey and how it picks up the same tones in the wall tile.

All in all, we are super pleased with the space and it functions beautifully for our family. I love that I have a peaceful little spot and that it can essentially turn into a big steam room when the shower’s running.

I will link everything I can here!

Contractor: Allure Kitchen & Bath (they were so great to work with- we already have them started on another project!)

Wall & Trim Color: Pure White by Sherwin Williams

Floor Tile • Shower Floor TileShower Niche TileShower Wall TileVanity Light

CLICK HERE FOR ALL OTHER FIXTURES + ACCESSORIES

#anglinabode Kitchen Reveal

AnglinAbode, HOME, HOME + LIFESTYLElissa-anglinComment
AnglinAbodeKitchen-1323.jpg

I am SO excited to show you this before + after. This kitchen remodel was the top priority for us in this home- and the first project we tackled. I’d better show you what we were working with when we bought this home first.

The kitchen is behind this beige wall- you can see the fridge and top of the faucet from here. Unfortunately, the kitchen had already been renovated in recent years- but was just not my taste at all, and though there was an attempt to open up the space, it still felt very dark and closed in.

320822ndSt-8855.jpg
320822ndSt-8861.jpg

You can see here how the kitchen opened up into the back living space- but again, it just felt really dark and I felt it had the potential to function a lot better for our family with some reconfiguration. In the photo below, the far corner that has an air vent is where the coffee bar is now. Check out this post to see all the details on the coffee bar!

320822ndSt-8869.jpg

Here’s my sketch of the kitchen after demo. You can see that the beams had yet to be installed and the pantry (to the left) has been opened to make it larger- more on the pantry here!

In this sketch the kitchen island is flipped the wrong way so you can see the side that actually faces the oven. I hadn’t decided if I wanted to do a color on the island yet, or leave it white. Also, you can see I switched from knobs to pulls.

Untitled_Artwork 3.jpg

And now for the reveal!

I really love how it turned out. For this project, we had to put in two beams, since the parts of the kitchen I wanted to open up were structural. I was worried that it wouldn’t be able to happen, and it would have been such a disappointment had we not been able to open it up completely- BUT our contractors got it done!

Opening up the kitchen to the hallway and the back living space made it a much more functional space for our whole family and we spend most of our time in this area.

AnglinAbodeKitchen-1081.jpg

I love, love, love my green island. Once I knew we’d be doing saltillo tile throughout this space, I wanted to counter all those orangey-reds with something complimentary but still natural feeling. This color is Relentless Olive from Sherwin Williams, and I have never identified with a paint color name more in my life. :)

AnglinAbodeKitchen-1115.jpg

The white color throughout our home is Pure White from Sherwin Williams. I have been so thankful that I chose to paint trim, walls, ceilings, and baseboards all the same color- it has made the painting process so much easier for me and everything is cohesive.

AnglinAbodeKitchen-1139.jpg

Here is a before photo of the main hallway- to the left is where the laundry room door and cubbies are now, and to the right is the kitchen and island. You can see we lost a lot of great built-ins, but the functionality and flow we gained was worth it.

320822ndSt-8845.jpg

Here is my design sketch for the cubbies- I eventually decided to leave the bottom section open so I could fit whatever baskets I wanted. This doorway was also previously just a wall between shelving- we created a doorway here and moved the laundry room to this area.

Untitled_Artwork.jpg

I love that these cubbies have storage as well as hooks for backpacks, jackets, etc. Their location in the house is really nice too, because they are an easy spot to unload as you come inside- our front door is just opposite the shelf with greenery in the photo below.

AnglinAbodeKitchen-1167.jpg

A few notes on design choices here:

  • This home immediately gave me a spanish/mission feel and I felt like I could make that work seeing that we are in West Texas- and so I wanted to keep the textures and tones warm and cozy without it feeling too cramped.

  • My mid-century loving heart also needed some gold hardware and white walls- plus some Atomic Ranch vibes. So, the globe-shaped pendants and sconces over the island and coffee bar- plus the chandelier over the coffee bar that includes globes really satisfied that for me.

  • I really debated on the backsplash tile- and initially thought I would just go with white subway- but when I went to sample it, the white tones were just completely off- our paint choice being a warmer white made the subway tile look cold and hospital-like, so I kept looking. Finally- I found some interesting geometric tile on clearance at Lowe’s- and it was perfect. I would have never guessed I would go with it, but for us it has been subtle with some uniqueness- and because it is dimensional I have enjoyed the way the light plays off of it throughout the day. Unfortunately, because it was on clearance, we almost didn’t have enough to finish the job! We ran out of tile 3/4 of the way through and finally located a few more boxes in the Dallas area, where my sister picked them up and saved the day!

CoffeeBar-6026.jpg
AnglinAbodeKitchen-1351.jpg
  • One of the huge perks of this home (and one of the things that convinced Shawn it was s good buy) was that all the appliances were basically brand new- like still had the warranty stickers on them new. So, we didn’t have to spend anything on appliances, with the exception of the fridge drawers and ice machine in the coffee bar. This was a huge savings for us.

  • I chose a black sink in the main island and the coffee bar and I have loved that choice. Not only does it hide stains well, it is super durable and I love the contrast. I’ll link everything below!

  • Our countertop is Macaubus Quartzite- and is probably my favorite thing in our kitchen. I knew I wanted something that had a lot of veining and movement, but marble made me nervous and quartz didn’t have the natural feel I was looking for. So, when we visited the stone yard, our friend who owns the place educated us on the different types of stones and found this slab for us. It is overall a light grey with some subtle green, blue, orange and purple tones. The green of the island really picks up the veining, which I think looks like a heartbeat line in some places. I absolutely love it.

AnglinAbodeKitchen-1231.jpg
AnglinAbodeKitchen-1267.jpg
AnglinAbodeKitchen-1158.jpg

I hope you enjoyed my tour! I’ll list links to everything I can link below!

White Paint Color: Pure White by Sherwin Williams. Our trim, cabinets and walls are all this color and it has made painting the whole house (my primary job in this reno) SO much easier!

Tile: Saltillo (terracotta) tile from Yates

Countertop: Macaubaus Quartzite purchased from Stone King in Lubbock

Contractor: Re-Purpose Construction

Everything else linked below!

#anglinabode kitchen + coffee bar inspo

HOME + LIFESTYLElissa-anglinComment
IMG_5601.JPG

SO EXCITED to share my vision for the #AnglinAbode kitchen and coffee bar area. First things first- our home is a Chicago brick home built in 1942, which I actually like- there are a lot of warm oranges- and that plus the xeriscaped front yard has always given me a southwest/desert vibe.

For the past several years, I have embraced more of my Texan roots and incorporated desert-style decor into our home. That, coupled with a visit to the Southern California desert earlier this year made me really want to lean into the Modern Desert feel with this home.

Of course, my mid-century-loving heart is still very much alive and so you can expect this home to have a little bit of everything- we can call it Mid-Mod Desert Eclectic. :)

Since we’ve gutted the kitchen and removed some walls, we decided to also put in a coffee bar into one corner of this open-concept space. Here’s what the kitchen is looking like so far:

Kitchen Inspo by Lissa Anglin

I grew up in a home that had saltillo (or terracotta) tile, and when we walked through this house, that idea just fit and the tile is very budget-friendly for the large space we are needing to cover.

Links:

Saltillo Tile (we purchased this locally)

Black Quartz Composite Double Sink

Gold Kitchen Faucet

Gold Bar Pulls

California Dream Quartzite (purchased through Stone Crown locally)

Globe Pendant Lights

Paint Colors:

Sherwin Williams Pure White

Sherwin Williams Relentless Olive

We are planning to do shaker-style cabinets in Sherwin Williams Pure White with gold bar pulls. I liked the detail on these pulls and they are nice and heavy feeling. The island we will paint Relentless Olive- I saw this green and read the name…and I just knew we had to use it. I think it will be a great way to balance the red-orange of the floor.

Very, very excited about the black sinks we have purchased- my parents renovated and installed black sinks and I loved the durability and the fact that they will hide stains well. We are including a smaller sink in the coffee bar, and I am so excited knowing that I won’t be bleaching out coffee stains constantly.

The pendant lights were the big splurge in the kitchen, and I’m glad I went for the ones I really wanted. They are a slightly lighter gold than the rest of the fixtures I have purchased, but my mom and I have a plan to remedy that soon.

Lastly, let’s talk countertops. We made a trip out to Stone Crown here in Lubbock which is owned by our friend Scott, and he educated us on the differences between granite, quartz, and quartzite. We went in thinking we’d be doing quartz, which is a man-made product, and extremely consistent in look and durable because of that. Granite was a no-go for me- just wasn’t the look I wanted, and quartzite I had never heard of. Scott told us that essentially, quartzite is a natural product so it has the organic colors and lines I was looking for, plus it is extremely durable. Previously it has been a very expensive product, but in recent years the cost has become comparable to quartz- and Scott was able to find us a slab that was in our budget and just beautiful. The color is called “California Dream” and it is a light grey with some interesting subtle green veins, which I think will pick up the island paint color nicely.

Ok, on to the coffee bar!

Coffee Bar by Lissa Anglin

Links:

Sconces

Chandelier

This was a compromise for me. I had ooohed and aaahed over this West Elm one, but could not justify the price. In the end, I found this one and I think I actually like it better! The straight (not-angled) bars on this chandelier create a more peaceful feeling than the West Elm (more sputnik) one, and we need all the peaceful feelings we can get in our home. I’m so glad I went with the one I did.

Black Quartz Composite Sink

Gold Faucet

Ice Maker

Guys, I cannot in good conscience tell you to purchase this ice maker from Amazon, which is what I linked here. We purchased it originally on Amazon and I’m not kidding- we had to return it 3 (yes, THREE) times because there was damage to the machine. So, we ended up finding one at a store a couple of hours away and picking it up to ensure there was no shipping damage. UGH.

Refrigerator Drawers

The ice maker and fridge drawers are the most bougie purchases we have made so far, but I do believe they will make this little area one of the most popular spots in our home! With 3 kids, I’m excited to have a place to put drinks for them that they can access themselves.

I also plan to paint all of the coffee bar cabinets Relentless Olive green. Since it is a separate space from the main kitchen area, and I want it to be a bit more cozy, I am hoping the color will add interest and an intimate feeling.

Hope you enjoyed my little inspo tour! There’s a lot more on my Pinterest board if you want to follow me there!

Check out my #AnglinAbode Kitchen + Coffee Bar Pinterest Board!